
 Created using a simple template and the Scrapdango September kit.
Monday, October 31, 2011
Friday, October 28, 2011
Halloween!!! Day 3
Good morning everyone! Today I thought I would share some ghoulish Halloween Titles for your next macabre page!
"Fangs" for the Memories
"Ill get you my pretty!...and all your candy too!!"
"The Boo Crew"
A Bootiful Night
A fairy enchanting time!
A haunting we will go
A HOWLIN' Good Time
A spooking we will go
A Spooktacular Day
A Spooky Good time
A Spooky Night
A Terror-ific Time
Best Witches
Boo Bash
BOO! Buddies
Bootiful Ghouls
Broom Parking - 5 cents
Bubble, Bubble, Toil and Trouble
Carving Memories one Pumpkin at a time
Chills & Thrills
Coffin Break
Creature Feature
Creatures Of The Night
Creepy and Kooky...Altogether Spooky!
Cutest Pumpkin In The Patch
Eat drink and be scary
Fangs for the memories
Frightfully Delightful
Ghouls Just Wanna Have Fun!
Goblins on the Loose
Hallo-Scream
I want my mummy
Jeepers, Creepers
Make No Bones About It
Mischief and Mayhem
Monster Mash
Monsters on Parade
Pumpkin Picassos
Scaring Up Some Fun
Spook-tacular Kids
Spooktacular Halloween
Spooky Friends
The Witching Hour
There's Mischief Brewing
Too Cute 2 Spook
Where the wild things are
Hope you enjoy these and they come in handy for your next spooktacular page!
"Fangs" for the Memories
"Ill get you my pretty!...and all your candy too!!""The Boo Crew"
A Bootiful Night
A fairy enchanting time!
A haunting we will go
A HOWLIN' Good Time
A spooking we will go
A Spooktacular Day
A Spooky Good time
A Spooky Night
A Terror-ific Time
Best Witches
Boo Bash
BOO! Buddies
Bootiful Ghouls
Broom Parking - 5 cents
Bubble, Bubble, Toil and Trouble
Carving Memories one Pumpkin at a time
Chills & Thrills
Coffin Break
Creature Feature
Creatures Of The Night
Creepy and Kooky...Altogether Spooky!
Cutest Pumpkin In The Patch
Eat drink and be scary
Fangs for the memories
Frightfully Delightful
Ghouls Just Wanna Have Fun!
Goblins on the Loose
Hallo-Scream
I want my mummy
Jeepers, Creepers
Make No Bones About It
Mischief and Mayhem
Monster Mash
Monsters on Parade
Pumpkin Picassos
Scaring Up Some Fun
Spook-tacular Kids
Spooktacular Halloween
Spooky Friends
The Witching Hour
There's Mischief Brewing
Too Cute 2 Spook
Where the wild things are
Hope you enjoy these and they come in handy for your next spooktacular page!
Tuesday, October 25, 2011
Halloween!!! Day 2
Are you having a Halloween Party? Or want to make some spooky treats for your family?
Here are a couple of yummy recipes I thought might be perfect for your ghouls!

"Boo-tiful" JELL-O Cups


all of these recipes are from www.kraft.com
Here are a couple of yummy recipes I thought might be perfect for your ghouls!
What You Need
1/2 leaf lettuce leaf
1/2 cup Kraft Rancher's Choice Dressing
4 cups assorted fresh vegetables (snow peas, carrots, cherry tomatoes, pepper strips, cucumber slices, cauliflower and broccoli florets, mushrooms)
Make It
LINE half of small bowl with lettuce for the skeleton's hair; fill with dressing. Place at one end of large tray or baking sheet for the skeleton's head.
ARRANGE vegetables on tray to resemble the skeleton's body.
Scary Skillet Shepherd's Pie

What You Need
3 cups frozen mixed vegetables (peas, carrots, corn, green beans)
1 lb. (450 g) ground beef
1 cup beef gravy
125 g (1/2 of 250-g pkg.) Philadelphia Brick Cream Cheese, cubed
1 cup milk, divided
1 cup water
2 cups instant potato flakes
1/4 cup Kraft 100% Parmesan Grated Cheese
Make It
COOK vegetables as directed on package. Meanwhile, brown meat in large skillet; drain. Stir in gravy; simmer until heated through, stirring occasionally.
MICROWAVE cream cheese and 1/4 cup milk in medium microwaveable bowl on HIGH 30 sec.; beat with whisk until smooth. Gradually whisk in remaining milk and water. Microwave 2-1/2 min. or until hot, stirring after each minute. Stir in potato flakes and Parmesan until well blended. Spoon into resealable plastic bag; cut 1 corner from bottom of bag.
REMOVE 12 peas from mixed vegetables; stir remaining vegetables into meat mixture. Squeeze potato mixture into 6 mounds on meat mixture to resemble ghosts. Add 2 of the reserved peas to each for the eyes.
"Boo-tiful" JELL-O Cups
What You Need
3/4 cup boiling water
1 pkg. (85 g) Jell-O Orange Jelly Powder
2 cups ice cubes
2/3 cup thawed Cool Whip Whipped Topping, divided
8 miniature semi-sweet chocolate chips
Make It
ADD boiling water to jelly powder in large bowl; stir 2 min. until completely dissolved. Add ice; stir 3 to 5 min. or until jelly is thickened. Remove any unmelted ice. Whisk in 1/3 cup Cool Whip until well blended. Pour into 4 dessert dishes.
REFRIGERATE 30 min. or until firm.
DROP remaining Cool Whip by spoonfuls onto desserts to resemble ghosts. Add chocolate chips for the eyes.
Witches Brew
What You Need
2-1/4 cups boiling water, divided
Hands
2 pkg. (85 g each) Jell-O Giggly Grape Jelly Powder
1 pkg. (85 g) Jell-O Orange Jelly Powder
3/4 cup fresh or frozen blueberries
Eye Balls
10 cups cold water
1-1/4 cups Kool-Aid Orange Sugar Sweetened Drink Mix
Punch
Make It
ADD 1-1/2 cups boiling water to grape jelly powders; stir 2 min. until completely dissolved. Pour into 8-inch pan sprayed with cooking spray. Refrigerate 2 hours or until firm.
MEANWHILE, add remaining boiling water to orange jelly powder; stir 2 min. until completely dissolved. Pour into ice cube trays. Refrigerate until partially set. Press blueberry into centre of jelly in each section of ice cube tray to resemble eye ball. Refrigerate until firm. Add cold water to drink mix in 2.5-L pitcher; stir until mix is dissolved. Refrigerate until ready to serve.
TRACE outline of small hand on piece of paper. (Size of hand needs to be 8 inches or smaller.) Cut out pattern with scissors; place on top of grape jelly. Cut around pattern with knife. When ready to serve punch, carefully remove gelatin hand from pan; place on rim of punch bowl, allowing fingers to hang over rim. Cut "fingers" from grape jelly trimmings. Add to punch bowl. Add jelly eye balls and punch.
Monday, October 24, 2011
Halloween!!! Day 1
I thought this week I would post some Halloween things for you!
Today I thought I would post a few Spooky projects found in the Dango Gallery!
this festive layout is by Lisa (pictures2pages)...he is so adorable!

And this too fun multi photo layout was created by Kimmy (lostinadream) fabulous pumpkins!

Kim (karennie34) did a fantastic job creating this sweet layout!

SGodard really did create a fun and fabulous layout...it is purrrrrrrrrrfect!
 Don't you just love this layout from Susan? Love how she was able to incorporate so many fun photos without the layout being overly crowded

This fantastic layout was created by Cheryl....aren't those photos adorable?

I hope you found some inspiration for your next Halloween project!
Today I thought I would post a few Spooky projects found in the Dango Gallery!
this festive layout is by Lisa (pictures2pages)...he is so adorable!
And this too fun multi photo layout was created by Kimmy (lostinadream) fabulous pumpkins!
Kim (karennie34) did a fantastic job creating this sweet layout!
SGodard really did create a fun and fabulous layout...it is purrrrrrrrrrfect!
Don't you just love this layout from Susan? Love how she was able to incorporate so many fun photos without the layout being overly crowdedThis fantastic layout was created by Cheryl....aren't those photos adorable?
I hope you found some inspiration for your next Halloween project!
Saturday, October 22, 2011
October Kits and Some Examples
Well after being a little delayed in getting some product, I finally got the October kits put together to reveal. I do think they were worth the wait, although they will ship on time, so no wait for kit club members to get them.
So here is the spice kit. This is a company I have used before, but it is fairly rare. It's the Ruby Rock-It Bella Paper Boy line. I love the bright, fun colors of this. All the cardstock in this kit is Core'dinations. The first two colors (red and aqua) are color core cs and the last color is black magic cs with a light blue core. I showed the black side and then the blue side.
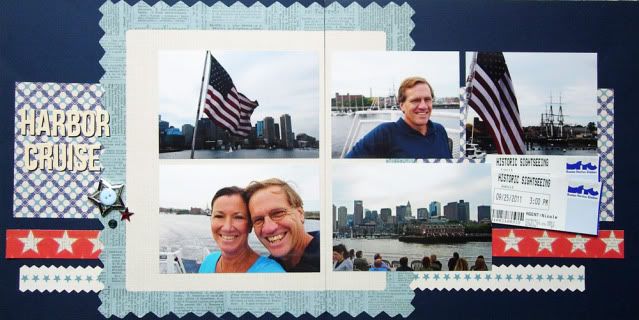
Here are some examples of layouts by DT member, Celeste Brodnik.

And the sugar kit is a very eclectic mix of papers from the new Amy Tangerine line from American Crafts, which I loved when I first saw it. I love how the papers all go together but aren't matchy matchy and there are some fun brights but lots of neutrals. One of the papers has real stitching on it too.
Here is a fabulous example layout by DT member, Megan Aaron.

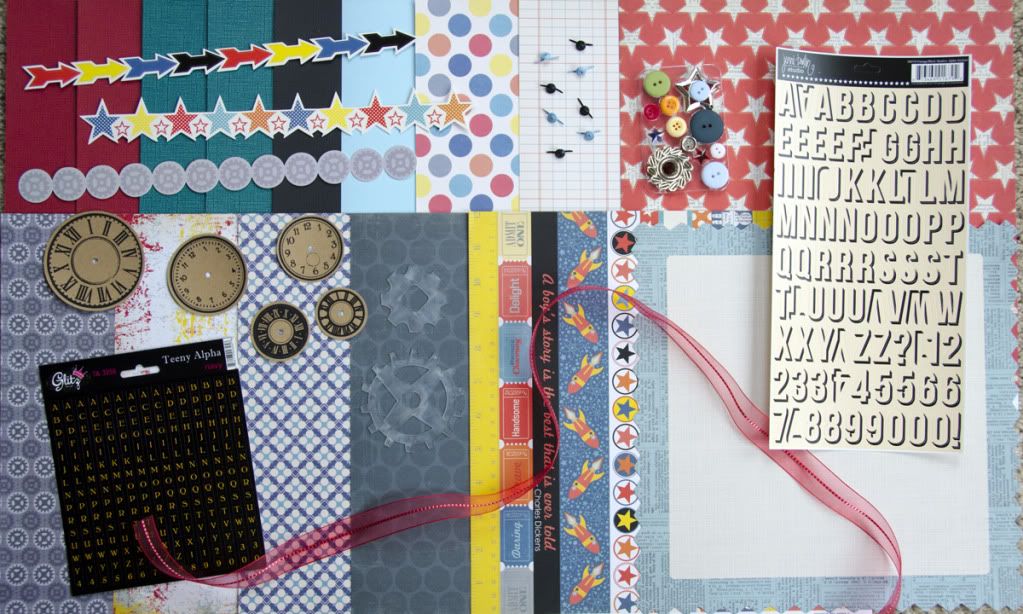
So here is the spice kit. This is a company I have used before, but it is fairly rare. It's the Ruby Rock-It Bella Paper Boy line. I love the bright, fun colors of this. All the cardstock in this kit is Core'dinations. The first two colors (red and aqua) are color core cs and the last color is black magic cs with a light blue core. I showed the black side and then the blue side.
October 2011 Spice Kit Featuring Ruby Rock-It Bella Paper Boy
Here are some examples of layouts by DT member, Celeste Brodnik.
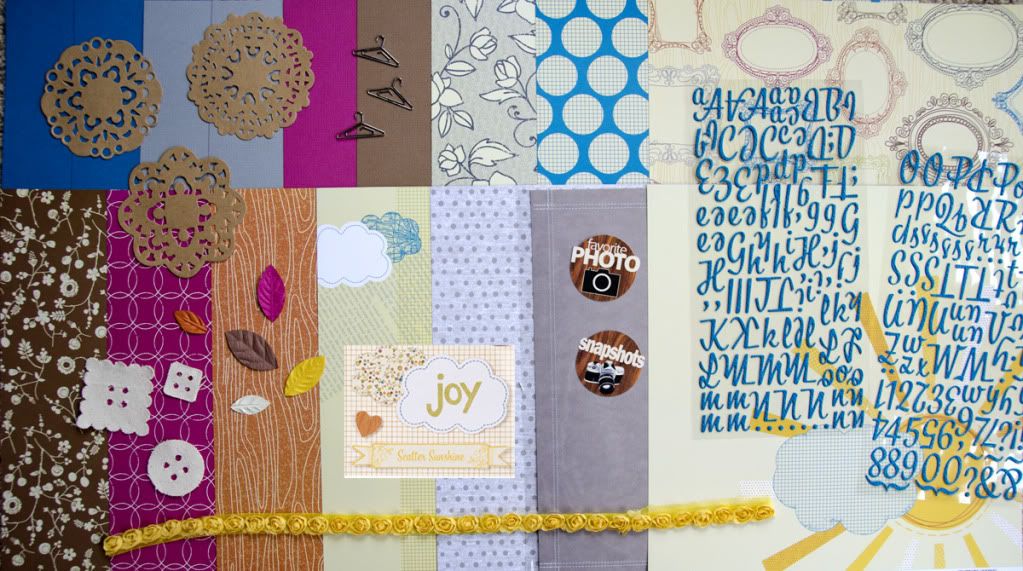
And the sugar kit is a very eclectic mix of papers from the new Amy Tangerine line from American Crafts, which I loved when I first saw it. I love how the papers all go together but aren't matchy matchy and there are some fun brights but lots of neutrals. One of the papers has real stitching on it too.
October 2011 Sugar Kit Featuring American Crafts Amy Tangerine
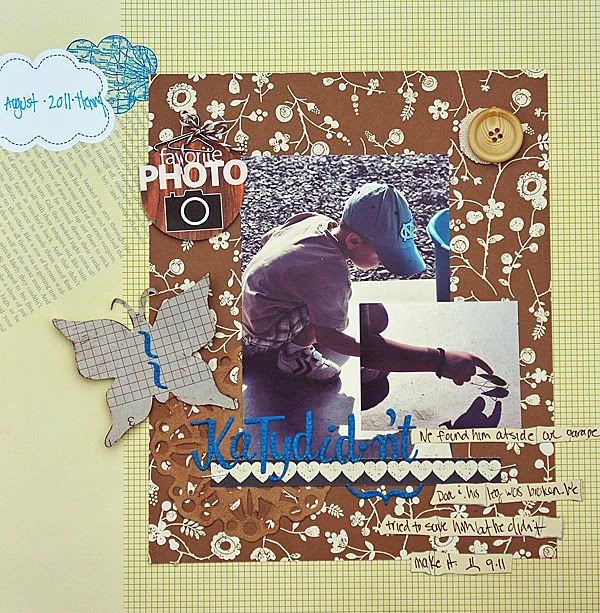
Here is a fabulous example layout by DT member, Megan Aaron.
and a fun one with a clever title by DT member, Ellen Sosnoski:
Tuesday, October 18, 2011
Terrific Tuesday
Well thank goodness Monday is over because now we can get on with our week. I don't know about you, but Monday's for me I am just barely able to get the kids to school and do the basic tasks for the day. I just feel like I'm doing so much catching up from the week prior and weekend. That may explain why I didn't get the Member Monday posted yesterday. So I bring you terrific Tuesday and some more great examples from the Scrapdango Gallery.
These are still some great examples of cards from our World Cardmaking Day Crop that I want to share with you. Here are a couple that caught my eye.
Love the simplicity and color of this one by Kim (karennie34)


Kristin, by the way, was the lucky winner of the School's In contest and will get a FREE 3 Month kit subscription. Congrats Kristin. Be sure to check out the forum, blog and/or Facebook page regularly to find out about new contests where you can win kits and other great stuff. As a side note, watch for news on an upcoming design team call. ;)
Coming soon: The much belated reveal of the October kits.
These are still some great examples of cards from our World Cardmaking Day Crop that I want to share with you. Here are a couple that caught my eye.
Love the simplicity and color of this one by Kim (karennie34)
Also love this adorable card and pencil set by Kristin. What a fabulous gift this would be for a teacher either at Christmas or end of the year.
Kristin, by the way, was the lucky winner of the School's In contest and will get a FREE 3 Month kit subscription. Congrats Kristin. Be sure to check out the forum, blog and/or Facebook page regularly to find out about new contests where you can win kits and other great stuff. As a side note, watch for news on an upcoming design team call. ;)
Coming soon: The much belated reveal of the October kits.
Wednesday, October 12, 2011
September Sugar Kit Tip
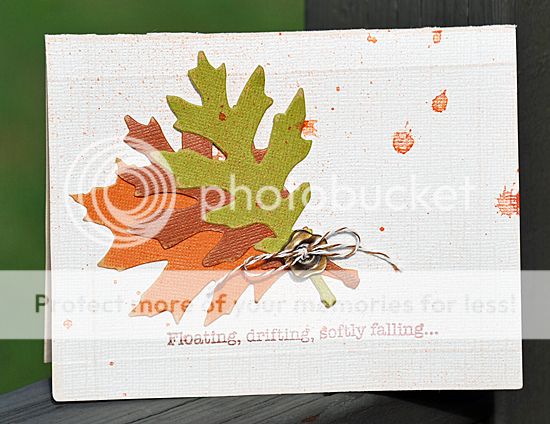
Today from Megan!
Fussy cut the leaves from the patterned paper to make your own, unique designs.

You will love love this kit! So many gorgeous papers and embellishments just for fall.
Twine Flower Centers
Baker's Twine is quite the rage in scrapping right now, so I thought I'd show you a quick way to use it to make a flower center. Start with a large circle of foam adhesive (I used American Crafts This to That Foam Tab Circles). Place the end of your twine in the center of the circle and wrap the twine in a circle until you have filled the entire foam circle.

Here is how I used the flower center on my card using Scrapdango September Sugar Kit.


Here is how I used the flower center on my card using Scrapdango September Sugar Kit.

Monday, October 10, 2011
Member Monday
Our members are finishing up on the World Card Making Day challenges. Here are a couple cards that caught my eye in the gallery.
This great boy card by Cheryl (chillycharlie) made for Laura's sketch challenge.

This cute diaper card by Kim (Karennie34) for Megan's clean and simple challenge.

This great boy card by Cheryl (chillycharlie) made for Laura's sketch challenge.
This cute diaper card by Kim (Karennie34) for Megan's clean and simple challenge.
Friday, October 7, 2011
Kits are arriving NOW!
September kits are arriving now...who is excited???
PERFECT timing for some CARD challenges, right???
Don't forget there is still time for the WCMD Challenges. You have until Sunday Oct 9th so get busy.
There are RAKS up for grabs and a 10 dollar GC to the STORE!!!
Here is Megan's Clean and Simple Challenge:

Heather's Tag challenge;

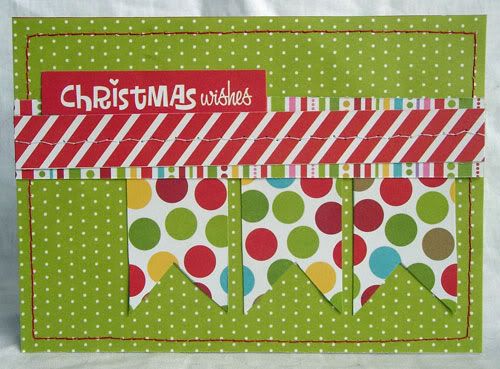
Celestes' Banner challenge:
Laura's Sketch challenge:

Ellen's Colour Challenge:
Vanessa's Recipe Challenge:
I'm interested to see what different things everyone will come up with so I will post my example closer to the end of the week.
Here is your recipe:
A4 card (4.25" x 5.5")
4" x 5.25" piece of patterned paper
0.5" x 5.5" strip of cardstock
1 - Border strip (sticker or diecut)
1 - Chipboard piece
1 - Sticker
1 - shape punched from cardstock (i.e. circle, scalloped circle, butterfly, leaf...etc)
Adhesive
Mix these ingredients to your liking.
Wednesday, October 5, 2011
Spice Kit Tips
Venssa is up with her September Spice Kit tips today!
First: Cut out the letters from the mini letter patterned paper and use pop up dots to accent them.

Second: Fussy cut the border around the Happy Days paper. Cut it up and use it as border strips.

Third:
Fill in the Basic Grey circle stickers with patterned paper.

Tuesday, October 4, 2011
Spice Kit Tips
We have some Spice Kit Tips for you today from Ellen:
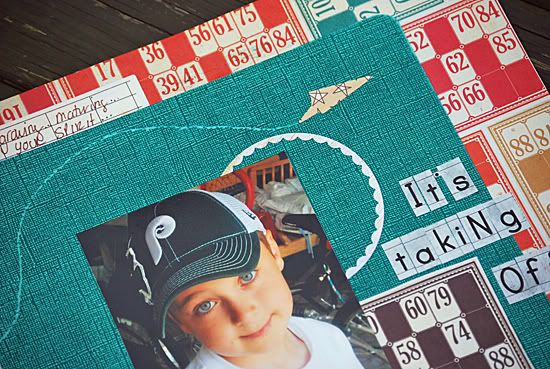
First up take the LYB letters and rub some ink with your finger to make them "not so white". They are really smooth and you can smear it around really easily. I used some Gray American Crafts Pigment inks on these alphas.

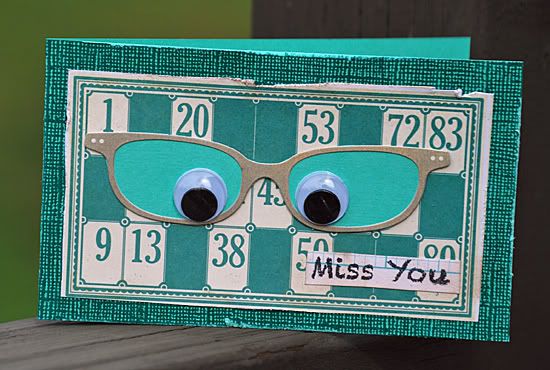
Who doesn't love googley eyes???
They are super cheap at the craft store and I love having them in my stash to add a fun element to any project.
When I saw these glasses on the BasicGrey sticher sheet, I knew I would use them right away.
Use the BasicGrey circle cardstock stickers for easy accents on your pages.
Monday, October 3, 2011
Member Monday!!!!!!!!
I was in the gallery this morning looking for some inspiration and saw THIS!
HOW CUTE IS THIS SET??? Makes me want to be a teacher :)
Kristin made these for one of the pop quiz challenges for the School's In Crop.
Here are the things I love about them:
1. BEES!
2. Scallops!
3. Big, huge ribbon
4.) POLKAS!
5. It was my challenge ;)
CONGRATS ON MEMBER MONDAY, KRISTIN!
Subscribe to:
Posts (Atom)


